Booking Sheet
The Booking Sheet is generally the first interface into the Book A Flight system. It can be viewed whether you are logged in or not, and provides a general overview of facilities, bookings and availability for the selected period. Please see this training video for more details.
Booking Sheet Layout
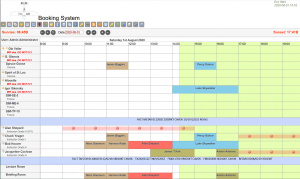
The bulk of the Booking Sheet is laid out as a simple table. Down the left hand side of the page are listed the Aircraft (and simulators), Instructors and Rooms (and facilities) that are available for hire. Across the page are the available timeslots.
At the top of the table are some useful navigation tools. The arrows allow you to move forward and backwards in increments of 2 hours and 24 hours. The Date field allows you to jump directly to a certain date. You can also move forwards and backwards through time by dragging the booking sheet grid left and right.
In the final fields in this top line comprise a "+" and "-" icon. These allow you to zoom in or out of the booking sheet if you wish to see fewer or more days at a time. In their most extreme this zoom in allows you to see about 4 days worth of bookings at a time (dependent on your screen size).
Clicking anywhere on the booking sheet will allow you to #Create a Booking. Clicking on an existing booking will allow you to edit that booking.
Information and Extras
At either end of the second line of the table the current time for sunrise and sunset are provided. These times depend on the location of the airfield so if these are not correct for your location please up date the LATITUDE and LONGITUDE entries in the Siteconfig screen.
The current METAR details are show on a strip between the aircraft and the instructors, while the current TAF is show between the instructors and the facilities sections.
The locations for which these weather strips display are set by the WEATHER_FIELD configuration option in the Siteconfig screen.
Logging in to the System
Above the table, is some header information as well as the menu strip (icons) for all of the actions that can be carried out. These are a house icon ![]() denoting a shortcut to the home page of the Club or Training Organization running the Book-a-Flight system, and an icon allowing the user to log in
denoting a shortcut to the home page of the Club or Training Organization running the Book-a-Flight system, and an icon allowing the user to log in ![]() . People who have been duly authorised will have been provided with a username and password to log into the system. Once logged in, a number of additional icons appear, depending on the user's level of access.
. People who have been duly authorised will have been provided with a username and password to log into the system. Once logged in, a number of additional icons appear, depending on the user's level of access.
Logging in allows an ordinary user to update personal data on the My Details page, and perform various other functions as configured by the specific flight school.
Booking Sheet Conventions
Availability is indicated on the booking sheet using a green background. A white background indicates timeslots which are already in the past. A pale beige background indicates the resource is not available during that timeslot and cannot be booked.
Bookings are shown as various coloured blocks, each colour having a significance. If your security level allows, the name of the person who has made the booking, as well as some brief details, appear within each block. Where descriptive text is too long to fit in the block a "speech bubble" icon appears. Hovering over the icon causes the rest of the description to appear to the right of the text. To the left of the name of the person booking, a Green or Red Tag ![]()
![]() appears indicating if that person has completed the green tag process for the day.
appears indicating if that person has completed the green tag process for the day.
Making and Changing Bookings
The Book A Flight system compiles and stores a full history of all interactions with it. Much of this can be viewed via the My Bookings page. The details below cover the absolute basics to create, take up and then pay for a booking.
The Book A Flight system can sent out email and SMS (text) messages whenever bookings are made or edited. Please see the Booking Change Notifications page of the documentation for details.
Create a Booking
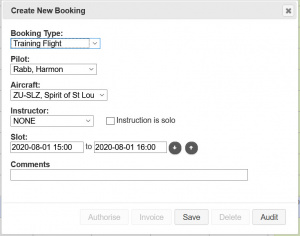
Click on an available place on the booking sheet to make a new booking. This causes the booking form to appear on top of the booking sheet. Fill in each of the required fields by making your selection from the available drop-down lists.
The first selection is for the "type" of booking. Other options change depending on the type of booking selected. For example, a charter flight does not require in instructor, a ground-school booking does not require an aircraft, etc.:
- Booking type
- Aircraft
- Instructor (including indicating if instruction is dual or solo)
- Resource
- Starting time
- Ending time
Then fill in the comment field. This should give any additional detail for flight. In the case of an instructional flight, the exercise or exercises to be covered can be entered. Once the entry is complete, click on the Save button. If you change your mind, of course, you can click on the cancel button to cancel your changes.
When you click the save button the system checks availability of all of the chosen resources and indicated if there are any issues to be resolved. Issues such as the resource already being booked cannot be overridden, however some issues (such as the unavailability of an instructor) can be overridden if the signed-on user has sufficient administration privilege.
Edit the Booking
If you are logged into the system, you may edit any future booking by clicking on the booking in question. Note that without sufficient administrator permissions you are only able to edit bookings made in your own name. Note, too, that some training facilities block all student pilots from making their own bookings and only staff members can make bookings for student pilots.
The edit form is laid out precisely the same as the booking form. However below it, you will see some additional information.
- If the booking is within the next 24 hours, a warning regarding the late cancellation fee will appear.
- An audit trail of changes to the booking is shown to allow a user to work out who made the initial booking (or any subsequent changes to it) and when.
Multi-pilot Briefings (Group Bookings)
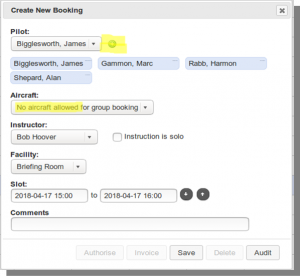
You can now add multiple pilots to a briefing. When making or editing a booking, if a) the booking has NO aircraft linked to it, and b) the booking does have a facility linked to it, then you will get a small green "plus" icon next to the pilot names listing. Choose each student in turn, and click the green plus to add them to the booking (see Figure 2). When you save changes to a group booking, the email notification of the booking will be sent to all students linked to the booking. The booking will show on the booking sheet as "MULTI-PILOT" instead of the named students, however each student linked to the booking will see this multi-pilot booking in gold (the same as with single student bookings in their own name) so that they are alerted to the fact that the booking in question includes them as one of the linked students.
Please note that the system will currently only generate an invoice for one of the pilots – additional invoices will need to be generated manually by your accounts department at present. If you have any concerns in this regard please contact Book A Flight.
Cancel the Booking
Select the booking to be deleted as for editing.
To delete the booking, click the delete button. Fill in the field indicating the reason for the cancellation and press the delete button again.
Bear in mind that in certain instances, a non-utilization fee may be charged for late cancellations. It is for this reason that it is critical to clearly state the reason for the cancellation.
Confirm your Tag Status
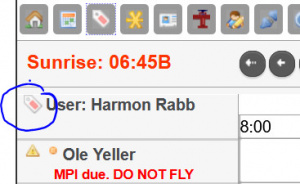
Please note that when viewing your bookings, the Red or Green tag will show on the menu bar. YOU WILL NOT BE ABLE TO CREATE AN AUTHORIZATION SHEET AND GO FLYING UNLESS YOUR TAG STATUS IS GREEN. It makes sense to check and address your Status well in advance of your booked slot.
Before The Booked Flight
Before you can proceed with a flight you need to go through a flight authorisation process. To do this, click on the booking in question and then click on the "Authorise" button. This button is disabled until two hours before the start of the booked slot.
Red Tag Check
Before the Autho Sheet can be generated, a check is done to ensure the pilot (and instructor, if applicable) conform in terms of the Red Tag System. It is not necessary to wait until you are preparing the Autho Sheet in order to Green Tag yourself. You can do so ahead of time. Any changes (such as new Notams) will revert your tag status to red, but the new Green Tag process will then require only that you familiarize yourself with that change.
Complete the Autho Sheet
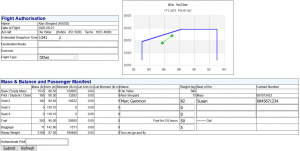
The Authorization Sheet will mostly auto-complete. Please check all of the information carefully as it is extracted from your Member Details and the details you provided for the booking. Editable fields are:
- The current time
- Generally this can be left as-is. If you are completing the paperwork before leaving home or office, however, do amend it closer to the intended departure time
- Destination
- This would be the destination airfield. If you are departing and returning to the same field, then the name of the departing field should be inserted there (e.g FACT for Cape Town)
- Exercise
- This field will be pre-completed with the details from your booking. You can amend it if plans have changed, or expand on it. Examples might be: "Scenic flight", "Ex 12, 13", "Swellendam Fly-In".
- Instructor / Payment
- Select whether you will be flying Dual with your instructor, or Solo. Specify whether payment will be direct to the Instructor or through the Club. These options are provided in drop-down lists. Note that in some situations all instructor payments are handled through the club or flying school directly, in which case this field is not shown.
- Flight Type
- Select the type of flight from the drop-down list. Options include AbInitio for PPL students, Instrument Rating, and so forth. Private hire and fly falls under the heading of "Other".
- Passenger Details
- If an aircraft with more than two seats is selected, then the option to add passengers becomes available. Fill in the required details for each passenger. Please bear in mind each passenger over 18 will be required to sign the Authorization Sheet. A parent or guardian will be required to sign on behalf of each passenger who is under 18 years of age.
Once you have completed and checked all fields, click Submit. At this point the system will proceed according to the requirements of the specific institution using the Book-A-Flight system. In some instances the Authorization Sheet will now be printed and a PDF version will be generated and stored on file. This can be viewed, printed or emailed as desired. Sign the printed copy and comply with whatever requirements are laid down by your Club or Training Organizations regarding the Club copy. In other instances the authorisation is confirmed online by requesting that the pilot and the instructor key in their respective passwords to confirm their acceptance of any conditions that apply.
Authorising a charter flight is exactly like authorising a “hire and fly” flight – the charter pilot is placed in seat 1 and the rest of the seats are available for passengers. Note, however, that the authorisation will be blocked if the booking is of type Charter, and the pilot does not pass the charter constraints discussed above.
If you wish to have the PDF document layout changed for any flight type please contact Book A Flight as the layout of this document can be structure to your requirements.
Weight Calculation
On the print notification page, a simple mass calculation is performed. This does NOT replace the need for a full mass and balance calculation, but is a handy guideline, as well as a clear warning if weight is excessive. It uses estimated fuel weight. The pilot, instructor and passenger weights are dependant on those provided to the system. No luggage is taken into account.
After the Flight
Generate the Invoice
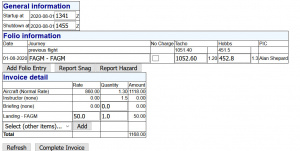
On completing the Authorization Sheet, your booking will have become a darker shade of orange. This indicates a flight which has been activated. On such a flight, clicking the key icon again ![]() , will cause the Invoice sheet to appear. The sheet has three sections, namely "Flight Information", "Folio Information" and "Invoice Detail"
, will cause the Invoice sheet to appear. The sheet has three sections, namely "Flight Information", "Folio Information" and "Invoice Detail"
- Flight Information
- Startup and shutdown times
- Update the startup and shutdown times correctly.
- Instructor Code
- Confirm whether the time was Dual or Solo and whether Instructor payment will be Direct or via the Club.
- Folio Information
- Here there should be one line per flight. If the flight comprised multiple legs (say, a cross-country with a stop, or a dual flight out, solo circuits, and a dual return flight) then the "Add Flight" button should be used to increase the number of line entries in this section. On each line entry the following items are editable and should be set correctly.
- Journey
- This should describe the flight leg: FACT-FACT, FACT-FAFK
- No Charge
- Tick this only in the case of a flight for which the pilot will not be charged, for example a test flight or a ferry flight undertaken on behalf of the Club. You can also use a No Charge entry to correct Tacho or Hobbs entries that differ from those that existed at the time you took possession of the aircraft.
- Tacho / Hobbs
- Complete each of these with the correct readings as at the end of the flight leg. Check the entries provided above the fields, as these should indicate the starting times. Report any discrepancy according to club or flight school procedures.
- PIC / Student
- Check each of these fields and select from the drop-down list. For a student flying dual, the Instructor would be "PIC". If the student were to undertake a solo leg, he would become "PIC" and the "Student" field would be marked "none".
- Refresh
- Once you are satisfied that all the information is correct, selecting "Refresh" will populate the "Invoice Details" section.
- Invoice Details
- Briefing
- The duration of the flight will be incremented by a set amount to cover the Instructor's time for any briefing/debriefing associated with the flight itself. The "Briefing" field is intended to allow for the billing of any full briefing which has been given. Fill in the correct duration.
- Landing (Local)
- A minimum of one landing at the field of origin is included in the flight. If additional landings are undertaken, increment the number appropriately. The cost of a local landing is known and will be calculated automatically.
- Landing(Other)
- If landings have been undertaken at a remote field, both the number of landings and the cost per landing must be filled in.
- Refresh
- Once all fields are completed and checked, select "Refresh" to recalculate the invoice to include all updates.
Click "Print" to produce a printed copy of the invoice. You will be returned to the booking sheet. A link at the top allows you to view the PDF of your invoice. This may be printed or emailed according to your requirements. On the booking sheet, your booking will have changed colour to brown. You should now pay for your flight in accordance with the procedures laid down by your Club or Training Organization.
On completion of a charter flight the “Invoice” screen is used to record the flight folio details for the charter. The invoice screen will record the flight folio and (as before) will accumulate the aircraft utilisation time (and Rand value based on the loaded aircraft rate) however the generated PDF document will be a flight folio record and not an “invoice”
Book A Flight Online Documentation
--Pamela@bookaflight.co.za 09:33, 13 April 2008 (SAST)
